Broadcasting a Webcam in 7 Easy Steps
Sometimes I see interesting things out the window at work, and I’ve been wanting to play around with the Raspberry Pi minicomputer. So for a small project, I decided to setup an autonomous webcam that could take pictures 24/7. You can view the end result here: http://ericheikes.com/cam. (It’s actually not very exciting. :)
This article will walk through the steps to:
- set up a free-standing webcam
- take a snapshot at regular intervals
- upload the snapshot to a web server
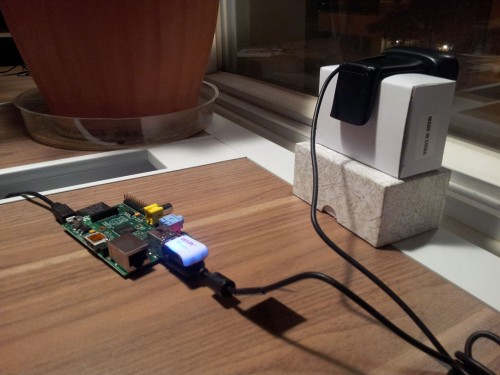
The complete setup.
Webcam Assembly
Step 1: Buy/collect the parts. For the hardware side, I used a Raspberry Pi board with a USB camera. If you don’t have any of the following (reusable) parts, they will run you around $100.
If you already have a webcam attached to your computer, then you could work with that instead of building something separately. Note: The programs I’ll be using are Linux-based, so you’ll need to run this on a Linux computer (or possibly a Mac).
Parts
The Raspberry Pi and related accessories can only be purchased through a few distributors; I got mine from Element14. The other parts can be obtained from any technology seller, such as Newegg or Amazon.
- Raspberry Pi, Model B. The Model B has 2 USB ports, which you’ll need unless use a USB hub.
- Raspberry Pi power adapter. Easy to forget, but essential. :)
- 4GB (or bigger) SD card. The Raspberry Pi website says branded cards are more reliable, but I found this to not be true.
- USB WiFi adapter. I got the WiPi, which was designed for use with the Pi, but any WiFi dongle should work. (The Edimax has been recommended by others.) You can alternatively connect using an ethernet cable, but who wants all those wires? :)
- USB webcam. I got the Logitech C310, but most USB webcams should work — check the UVC list for supported devices.
For more info about hardware requirements for the Raspberry Pi, see the Quick Start PDF.
Required for Setup
- SD card reader. To prep your SD card, you’ll need a way to connect it to your PC. A SIM reader like this one from Dynamode plugs into a USB port. If you don’t want to buy a reader, and bypass some of the setup, you can purchase a pre-programmed SD card. If you plan on doing any more Pi tinkering in the future though, you’ll probably want to invest in a reader.
- USB keyboard.
- USB mouse.
- Monitor/TV with HDMI or RCA input, and the appropriate cable.
- USB hub. Because you need 4 USB devices plugged in during setup, a 4-port hub will come in handy (unless you want to use an ethernet cable and log in via SSH from another computer).
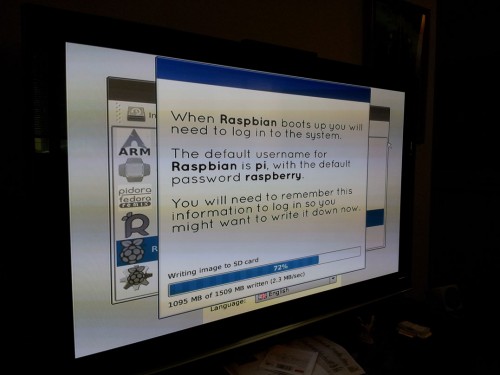
Step 2: Install an operating system on the Pi. The Pi website covers this, but the basic process is:
- Format your SD card. (My SD card was already partitioned and formatted as FAT32; if you can copy files to your SD card, it’s probably good.)
- Download the NOOBS files, extract them, and copy them to your SD card.
- Connect your keyboard, mouse, and monitor to the Pi. Insert the SD card and plug in the power.
- When the Pi boots, it will give you options of operating systems to install. The recommended OS (Raspbian) is a good choice.
- Run through raspi-config to change the password, set the locale, and set the timezone. Also, go to the Advanced options to set a hostname and enable SSH. If you’re in the US, you’ll need to manually change your keyboard layout from UK.
If you bought a pre-programmed SD card, you can skip this step.
Software Setup
First, a note: The Pi seems a little finicky when connecting USB devices. It might be because it has a slower processor and I’m impatient, but most of the problems I ran into were fixed by (a) unplugging and re-plugging the device, and/or (b) restarting the Pi.
For the next steps, you’ll need to log in at the Pi console. If you’re not familiar with the command line, you should check out an introduction — for this project, you don’t need to do much more than ls and cd. You’ll also need a basic working knowledge of default text editor nano.
Step 3: Set up wifi. First, plug in the wifi dongle. Raspbian comes with networking and WPA Supplicant. You can theoretically edit the /etc/network/interfaces and /etc/wpa_supplicant/wpa_supplicant.conf files using a text editor, but I found the WPA graphical interface to be the easiest method.
At the console prompt, type startx and press Enter. Once the LXDE desktop is running, double-click the WiFi Config icon on the desktop. The wpa_gui window should open. Go to Network->Add and fill in your WiFi information. You’ll want to double-check the settings with your wireless access point, but here are some hints:
- SSID is the name of the access point.
- Authentication is (hopefully) WPA Personal or Enterprise. Note that WPA and WPA2 are 2 different options.
- Encryption is probably CCMP (aka AES). If you are using WPA (not WPA2), then you might have to choose TKIP.
- PSK is your password (“pre-shared key”).
- The other settings can be left blank. (Unless you’re using WPA Enterprise, but if so, you probably know what you’re doing.)
If the successful, the WiFi dongle should connect, and the “Current Status” tab should update with the details (notably the IP address; you’ll want to remember this). Once it’s working, be sure to go to File->Save Configuration so the Pi remembers your settings.
Note: I had to enable the “Broadcast SSID” option on my access point; I don’t believe that wpa_gui is able to find hidden access points.
At this point in the process, you can disconnect your keyboard, mouse, and monitor, and log in to the Pi from any computer on the network using an SSH client (the terminal for Linux or Mac, PuTTY for Windows) by typing pi@x.x.x.x (replacing x.x.x.x with the Pi’s IP address). The Pi seems to be a little pokey with networking too, so if you can’t connect immediately, try again.
Step 3: Plug in the camera. Hopefully, it will be automatically be detected. (To see the activity log, you can type dmesg at the console prompt.)
In my situation, the Pi was capturing video, but it was garbled into red/blue shapes. Re-plugging the camera and restarting the Pi eventually got it working properly.
For automating snapshots, we’ll be using the streamer program, so install that:
> sudo apt-get install streamer
Step 4: Write the snapshot script. These shell scripts are so simple they don’t need to be in a file, but I found it handy for debugging and manual invocation. Create a file in your home folder (nano ~/snapshot.sh) and type the following into it:
#!/bin/sh
streamer -o webcam.jpeg -s 1280x720 -j 100
This will take a single image at 1280 pixels wide and 720 pixels tall (my webcam’s resolution), and save it as webcam.jpeg in the same folder. Note that streamer requires a .jpeg extension — .jpg will not work. The -j flag tells it to save the JPEG at maximum (100%) quality. You can tweak the -s and -j values to suit your needs.
Save and exit out of nano, then run chmod a+x ~/snapshot.sh to make it executable. You can now manually invoke the script by entering ~/snapshot.sh at the command line prompt. If everything goes well, you should see output that says as much, and a webcam.jpeg file should be in your home folder.
Any errors could be caused by a number of problems. If it says no device could be found, then make sure your webcam is working and Linux-compatible.
Step 5: Write the upload script. Like the snapshot script, this is just a file in your home folder. However, the contents depend on where you want to upload the photo. For my purposes, I’m uploading it to my website via SSH. Many (Linux-based) hosting companies offer a plan that includes SSH access; it’s the easiest and most secure method for uploading files to a web server. A script could be written to upload using a different protocol (such as FTP), or to any service that accepts files (such as Dropbox or Tumblr), but that would require some programming or extra software and is outside the scope of this article.
SSH typically requires you to type a password when connecting. To automate the uploading, you’ll want to make passwordless login possible. This article walks you through generating a key (which you need) with ssh-keygen and copying it to your server with ssh-copy-id. Once that is in place, you can run nano ~/upload.sh and fill it in with your website details:
#!/bin/sh
scp -q /home/pi/webcam.jpeg eric@ericheikes.com:/var/www/ericheikes-com/html/cam/webcam.jpeg
The stuff after the colon is the folder path where you want the file to go, and depends on your server setup. You might have to do some digging or check with your host’s support to get this information.
Now run chmod a+x ~/upload.sh to make the script executable. Again, you can manually run this script by typing ~/upload.sh at the prompt.
Step 6: Set up crontab for periodic snapshots. In order to run the snapshot and upload scripts periodically, you need to create something called a crontab. Type crontab -e at the prompt, and when the editor opens, add the following to the end of the file:
* * * * * /home/pi/snapshot.sh
* * * * * /home/pi/upload.sh
This will run the snapshot.sh and upload.sh scripts every minute. When you save and exit the editor, the new crontab will automatically be installed (look for the message”installing new crontab”). The Pi will now automatically take photos and upload them to your website!
Step 7: Create webpage. Unless you just want to point visitors to the webcam image itself, you’ll probably want a webpage that makes it look somewhat nice. Here’s a basic index.html file that you can upload to the same folder as webcam.jpeg; it auto-refreshes the page every minute:
<html>
  <head>
    <meta charset="utf-8">
    <title>Cam</title>
    <meta http-equiv="refresh" content="60">
    <style>
      * { box-sizing: border-box; }
      html, body { margin: 0; padding: 0; width: 100%; height: 100%; overflow: none; background: #000; color: #fff; }
      body { background: url(webcam.jpeg) 50% 50% no-repeat; background-size: cover; }
    </style>
  </head>
  <body/>
</html>
You don’t need to use the Pi to create and upload this file. You can use whatever computer and editor you are comfortable with.
Conclusion
The Raspberry Pi is not as reliable as an embedded system (it frequently needs to be rebooted), but it makes small hobbyist projects easy to build. If you’d like to play around with the Pi, check out the Adafruit website for guides and inspiration.

Valley Junction Farmers Market from the webcam.
|